
Parts
- Hacking the Dispenser
- Configuring Home Assistant for Automation
- How do we know it's working?
Note: this turned into a very long and detailed explanation of my project, so I've broken it up into three parts. This part focuses on the actual hacking of the hand sanitizer dispenser. Part 2 will show how to use Home Assistant to automate actions in the classroom. Finally in Part 3, we'll try to understand if it's actually working to change student behavior.
Carrots vs. Sticks
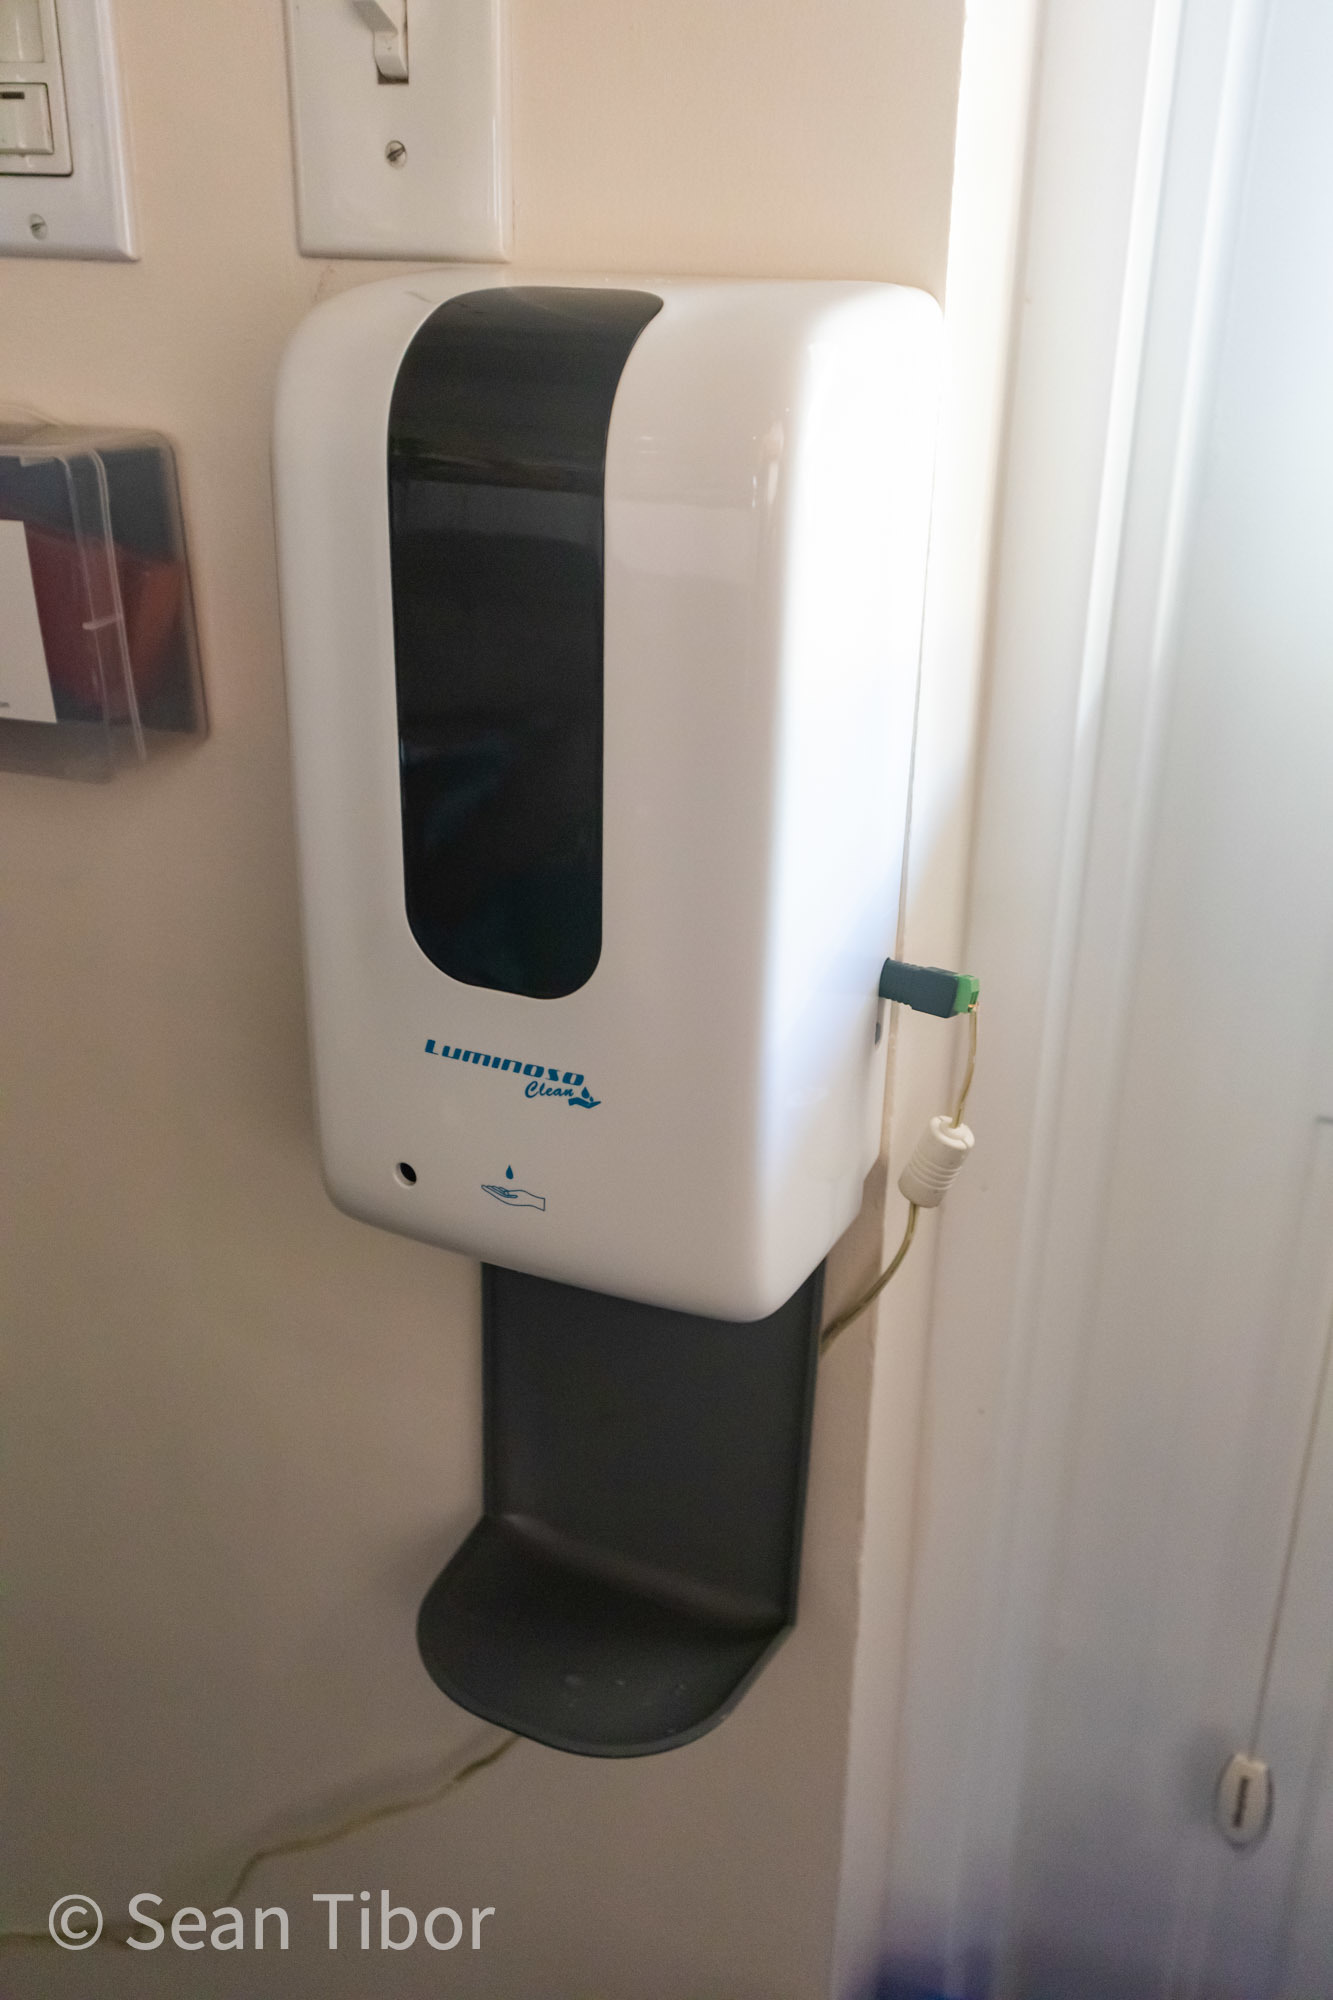
Last year before COVID-19, my classroom's hand sanitizer dispenser sat with dead batteries for months. I'm not even sure if it would have worked if we had new batteries. For obvious reasons, this year my classroom came equipped with a shiny new hand sanitizer dispenser, with the goal of getting every student to sanitize or wash their hands at least once every two hours.
Over the first few weeks of school, I noticed that very few students sanitized their hands unless I told them to. As the CDC has noted, frequent hand washing and hand sanitizing is one of the best ways to prevent the spread of COVID-19.
My marketing/technology brain spun to life as I pondered this problem. How can I get my students to want to sanitize their hands? If I have to remind them, then it all depends on my reminders. This has a lot of drawbacks, like I often forget to remind them with everything else I'm doing, they might try to avoid it, and we have no data-driven way of knowing if my reminders are effective.
Just like that shaving soliloquy in The Hunt for Red October, I asked myself "How do you get middle school students to WANT to sanitize their hands?"
The answer I came up with was twofold: first, make it fun. Then, make it easy for students to see themselves in the data.
Home Assistant to the Rescue!
My idea was to make it so that when the dispenser activates, some lights in the room would flash colors, Alexa would say something funny, and students would be able to see how many times the sanitizer was used that day.
The trick was figuring out a way to automate all of this in an easy way. While I could roll my own solution using pure Python, there was a platform already designed for this. I had even already trained myself on how to use it.
My quarantine project during COVID was to automate more of my home using the Python-based Home Assistant project (formerly known as HASS) and I realized it would work very well to bring all of these parts together in a relatively easy way for the classroom.
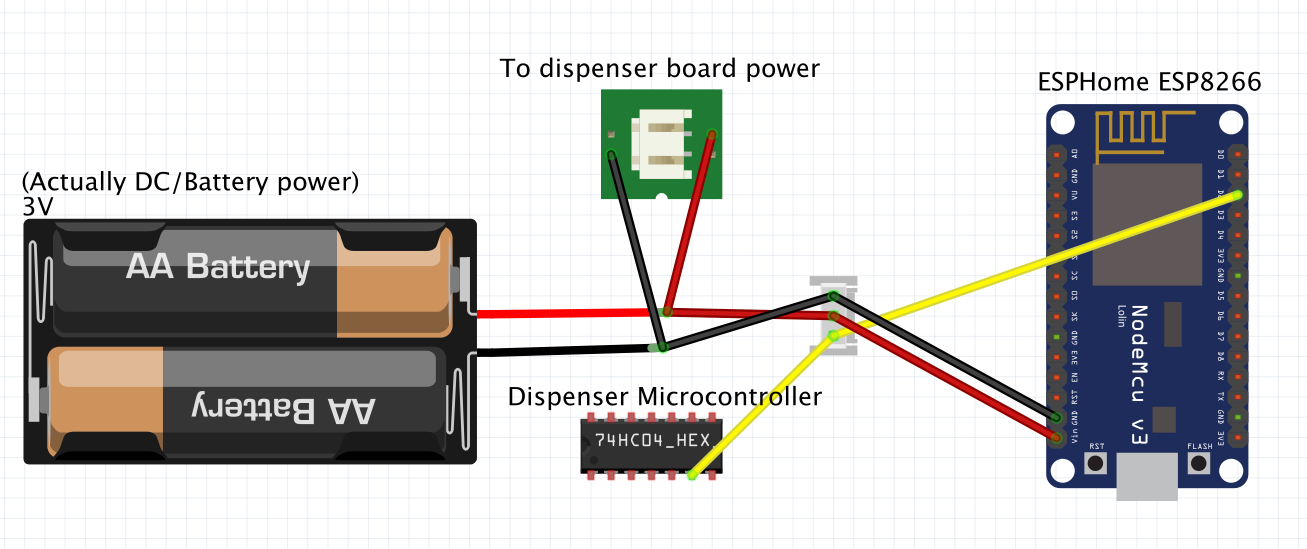
I dug through the storage bins in my room and found a Raspberry Pi 4, some Yeelights and even an ESP8266 NodeMCU board that I could wire up to the dispenser. To make it easy to swap out boards, I added a 3-pin JST PH connector to the system to make it easy to plug in the NodeMCU.
Parts List
- Luminoso Clean Hand Sanitizer Dispenser
- ESP8266 NodeMCU
- JST-PH 2- & 3-wire connectors
- Amazon Echo
- Raspberry Pi 4
- Yeelight
- Unused Lamp from my daughter's room
Wiring up the Dispenser
The dispenser was the most hands-on hack and the biggest question mark for me. How would I know if the dispenser was activated? It turns out that the dispenser works with an IR sensor that detects when a hand is under it, just like a touchless water faucet.
When the dispenser activates, it runs a motorized mechanism that dispensed a certain amount of alcohol-based hand sanitizer gel. Importantly for our project, it also briefly turns on a UV LED that shines on the person's hands. Using a multimeter, I was able to trace the leg of the dispenser's microcontroller chip that turns on the LED. Then, I made up a three-wire JST-PH wiring harness that connected to that leg and the dispenser's power supply.
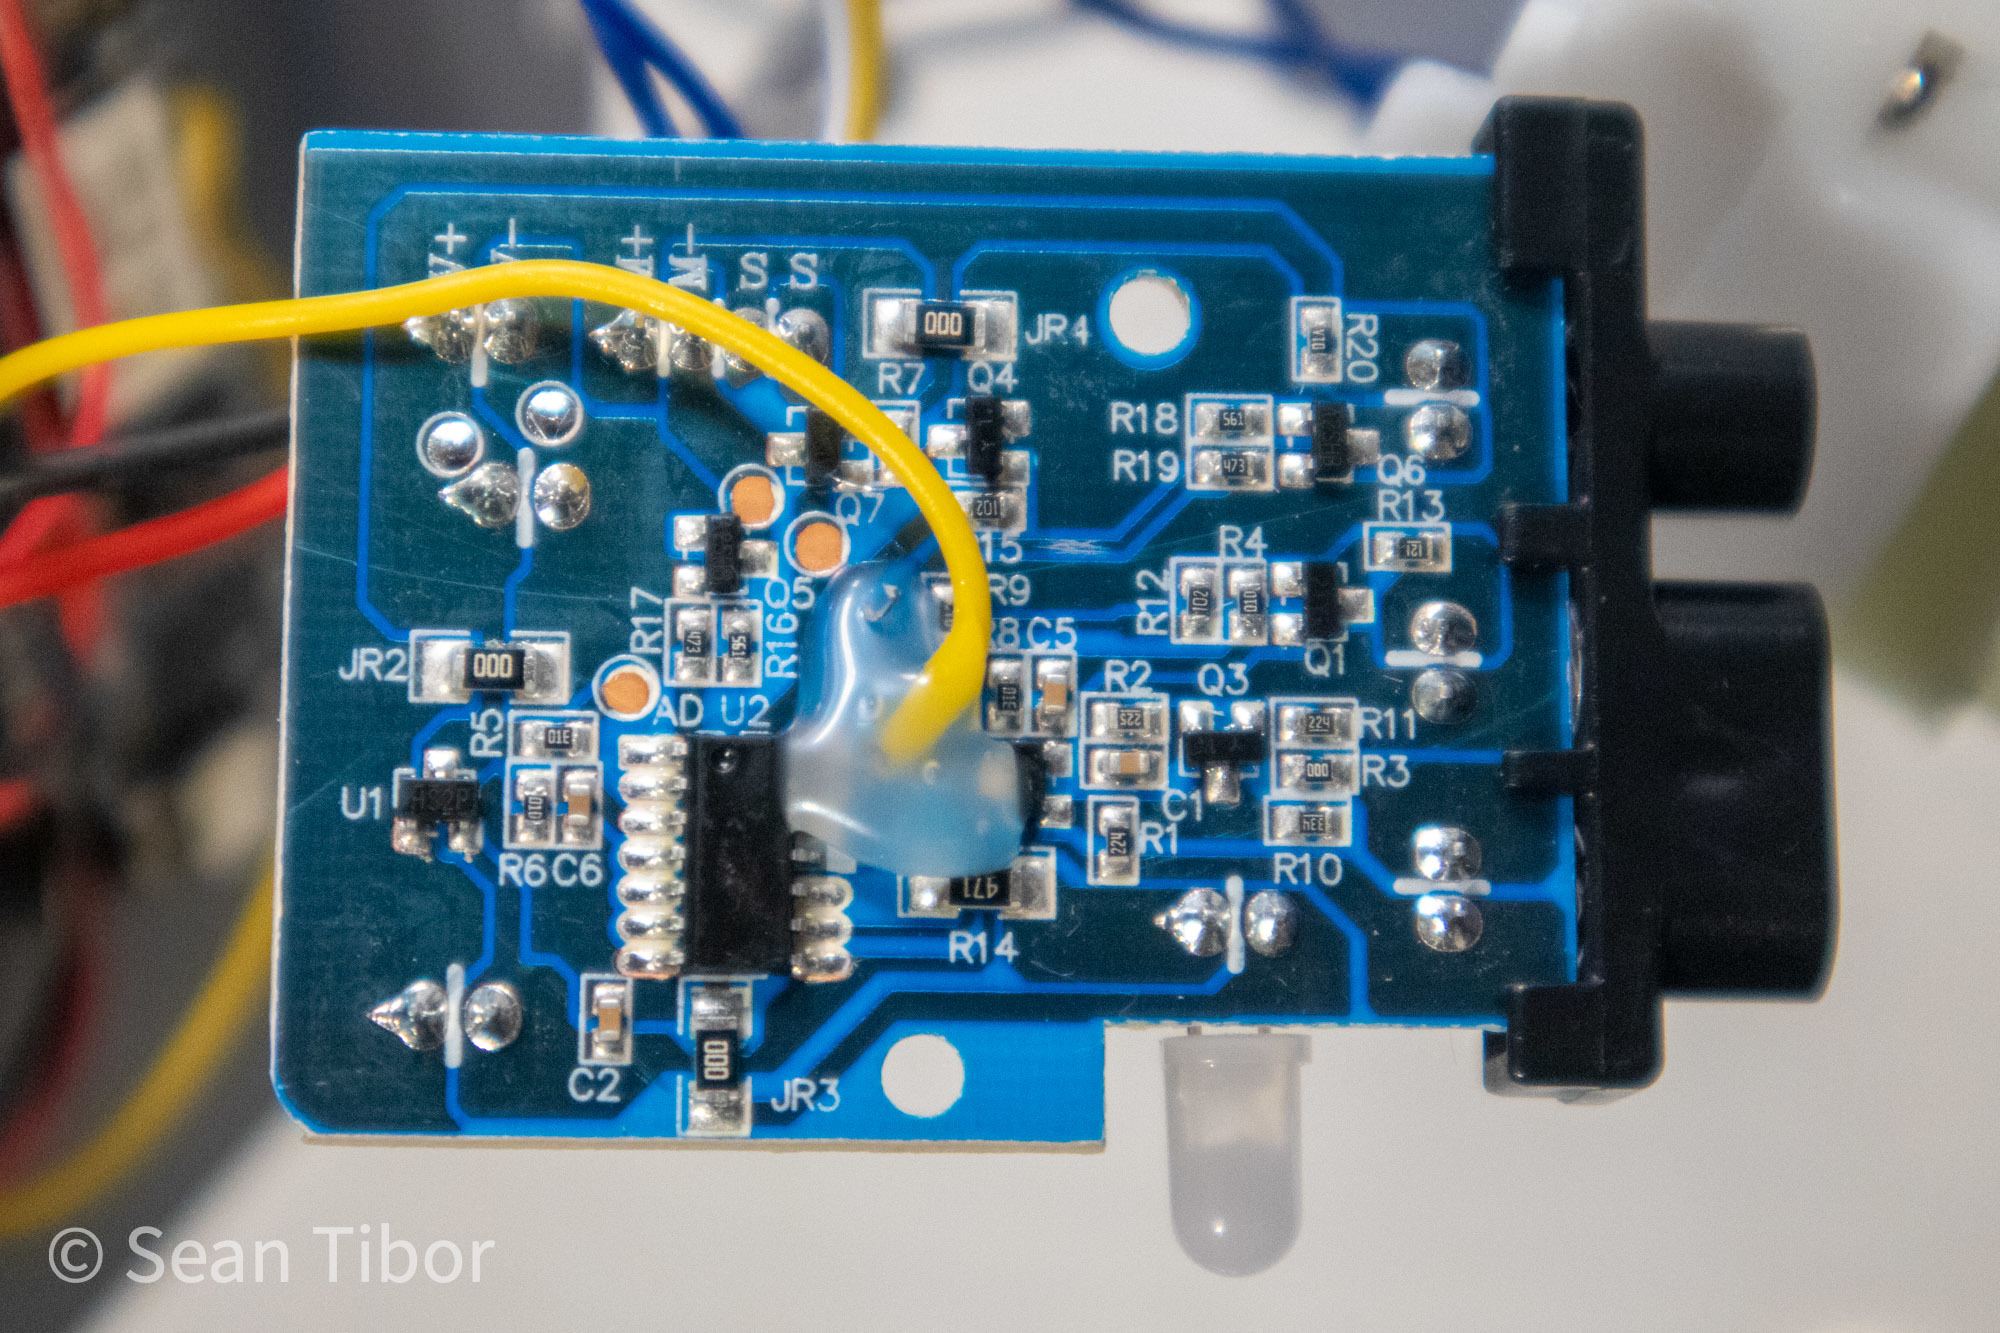
I had to solder a wire directly on the leg of the microcontroller to get the LED signal. Be very careful with this connection and take your time. I tinned the wire with a bit of solder to make sure I didn't add too much.
For the power connection, the dispenser uses a standard 2-wire JST connector. I made a Y-connector out of a male and female 2-wire connector that also connects to the positive and negative wires on a 3 wire connector. This allows me to plug the battery connector into the female and the male end into the dispenser board without changing any other connections. The three wire end is routed through a hole drilled in the side of the electronics enclosure, then plugged into a three wire connector soldered directly into the NodeMCU.
The ESP8266 communicates over WiFi, which tends to be power hungry. For now, I've plugged the dispenser into mains power so I don't have to worry about draining the battery prematurely.
Setting up Home Assistant
Now that I had my dispenser hacked together, I needed to set up the Home Assistant server on the Raspberry Pi. For this, I mostly followed the standard setup instructions. In addition to the standard setup, I added the ESPHome addon to make it easy to setup and control the NodeMCU.
Pros for using Home Assistant in the Classroom
- Cheap (Runs on a Raspberry Pi)
- Open Source (and frequently updated!)
- Wide array of relevant integrations:
- ESP8266/ESPHome for hacking the dispenser
- Yeelight lightbulb for signaling the dispense
- Amazon Echo for making announcements
Setting up ESPHome
ESPHome makes it easy to connect microcontrollers to a Home Assistant server. It's really full-featured, even including the ability to send firmware updates over WiFi to your boards. I configured the ESP8266 to act as a binary sensor, meaning that when the light was on, it would send an ON message to the HA server.
esphome:
  name: tibor_sanitizer
  platform: ESP8266
  board: nodemcuv2

wifi:
  ssid: !secret wifi_ssid
  password: !secret wifi_password

  # Enable fallback hotspot (captive portal) in case wifi connection fails
  ap:
    ssid: "Tibor-Sanitizer Fallback Hotspot"
    password: "MeUPw7DTWxFi"

captive_portal:

# Enable logging
logger:

# Enable Home Assistant API
api:
  password: !secret api_password

binary_sensor:
  - platform: gpio
    pin:
      number: D2
      mode: INPUT_PULLUP
    name: "Sanitizer Dispense"
    device_class: moving
ota:
  safe_mode: true
  password: !secret ota_password
The key entry here in the config file is the binary_sensor gpio entry that tells the ESP8266 to monitor the D2 pin for the sanitizer's UV LED signal. When that light turns on, it will send a message to the Home Assistant server that the sanitizer is ON.
Testing Communications
Now that we have Home Assistant and ESPHome setup, we can test to make sure that the sanitizer is still working and that it's communicating with Home Assistant.
First, you'll have to add the dispenser as a new integration. If you don't already see the dispenser pop up as a new sensor on the network, you can go to Configuration->Integrations and press the Plus button in the lower right side of the screen to add the sensor.
Follow the prompts and name the device in the dialog box. When you're finished, you should have a new Home Assistant entity for the dispenser that you can monitor for state changes.
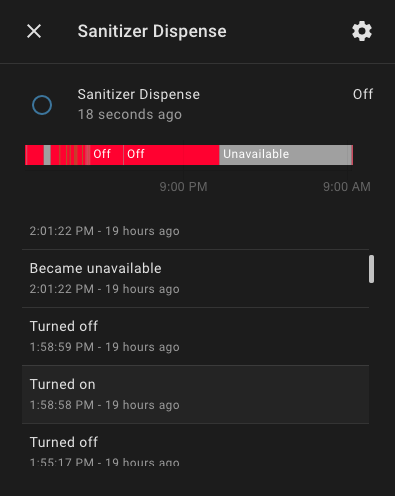
When the sanitizer activates, you should see the state of the entity change from off to on, then back to off when the LED shuts off.
Summary
Whew - that was a lot of hacking, soldering, and nerve-wracking disassembly of the dispenser, but it should be communicating with your Rasberry Pi. When this part is finished, you should have a dispenser that functions just as before, but now sends a message to your local Home Assistant server when the dispenser is activated.
In Part 2, we'll use Home Assistant to automate lights and make Alexa say funny things to the students. Our goal will be to make it so that students can't wait to hear what she'll say next.
Finally, in Part 3, we'll look at the data collection side of this and hypothesize ways to further increase student usage. We'll also look at ways to use the data to prove that it's increasing student usage of the dispenser.