In Computer Science class, designing quality learning experiences meaningful to our students is the ultimate goal. Developing ways to accurately evaluate students' learning using real-world situations that are applicable yet challenging is the underlying focus.
This blog series will take a deep dive into authentic assessment components and what entails quality assessments. Authentic Assessments in education are a complex topic full of multifaceted features.
Previous posts on Authentic Assessments:
⁍ Three Tips for Designing True Authentic Assessments
⁍ Setting High Expectations For Authentic Assessments in Computer Science
In this blog post, we will look at using rubrics to judge achievement on authentic assessments.

Rubrics are an excellent tool for both teachers and students when it comes to grading authentic assessments in Computer Science. To learn more about the history of who coined the term and the studies behind them, check out this article from Linda Suskie titled, "An assessment beach read: Where did rubrics come from?"
Because authentic assessments are designed to replicate real-life situations, grading them can be very subjective. Therefore, using rubrics help teachers to be consistent in their grading and stay focused on the criteria initially identified for the task.
Rubrics are not as daunting as they may seem and, with practice, become an excellent tool for designing and planning activities as well as grading them.
Here are five easy steps for designing quality rubrics for authentic learning assessments.
Step one: Writing out General Expectations (Skills or Content)
Write out what you want students to do and, more importantly, what they need to know to do it well. Writing clear expectations is the hardest step in building a rubric. However, if a teacher cannot quickly identify these primary criteria, the assessment may need more refining.
This process of identifying the end results first is often referred to as a "backward by design approach." This is when a teacher can look at the end product and work backward at the instructional steps and activities needed to lead students to an end goal. To learn more about Grant Wiggins and Jay McTighe's work on Backwards By Design, check out this short video and article from Vanderbilt University.
I always like to start with a list of things that the students will use for a final task. These are typically brief and also broad topics that come from my curricular objectives.
For example, students in Computer Science need to know the python basics concepts such as: data types, comments and docstrings, conditional statements, etc.
In the beginning, this list may be general, but as you make more task-specific rubrics, your list may contain more specific items. You will be more focused on seeking out the "Enduring Understandings" versus the things that may "worth being familiar with."
The carefully selected items from this list often turn into the "bolded" headers for my rubric. When converting these to headers, try to keep the items simple with generic concepts or skills.
Some concepts listed may be used repetitively throughout the course and often vary in complexity due to the specific topic. Therefore the concept may be used in the rubric more often than you think, but varying specifics. Other concepts may be necessary to know and do but can be used elsewhere in another assessment.

Step two: Listing Specifics for Completing the Final Task
Now it is time to break down the skills into specifics for the assessment. What precisely "can" be done with this topic. Consider the task, and the bold concept, list the essential concepts that could be covered in class and on this task.
Go through each item in the original list and write bullet points that break down the specifics for completing the tasks. Do not worry about sentences or punctuation yet.
We will use one of the criteria from the list of criteria above for an example.
An example bullet list may look like this:
⁍ single-line comment fits in one line
⁍ comments describe the purpose of the code
⁍ Comments are as close to the line they are describing
⁍ Comments do not use complex formatting
⁍ Not redundant
⁍ Docstrings provide the user with a general overview
⁍ Docstring has triple quotes
⁍ Docstring is appropriately formatted- has a primary one-line comment, then space then elaboration, then space
⁍ Consider the progression of programmer and skill level: from no documentation to full developer documentation
If this is the first time brainstorming, the list may be very long. However, after more experience, you will get the hang of it and omit the criteria that are not suited for your age level or task.
You may be more aware of what is possible and what is already pushing the students' limits.
For example, I know that my students may have had some practice with comments and docstrings. I want them to know the importance of documenting their work; however, it is not the most critical factor in this assignment. Therefore, after weeding out my list, I now have this bullet list for my 7th-grade students:
Use of Comments and docstring
⁍ single-line comment fits in one line, less than 72 characters
⁍ comments describe the purpose of the code
⁍ Docstrings provide the user with a general overview
⁍ Docstring has triple quotes
⁍ Docstring explains the program and/or the function
Step three: Writing Power Statements
Now it is time to write power statements. I like to use "the student will be able to" in my rubrics to help remind students that it is their role to complete these steps. It sounds silly, but directly stating this helps to build ownership and guide feedback.
I sometimes use a Bloom's taxonomy Verb Chart (Click here to see an example) to formulate my bullet point statements. Some statements will require recall or knowledge acquisition, and others may need analysis or application. Using these words can also change the strength or complexity of the statement.
After adding power statements, my list looks like this:
Comments and docstrings: The student will be able to...
⁍ design single-line comment that follows the PEP8 rule of fewer than 72 characters.
⁍ effectively provide comments to describe the purpose of the code
⁍ develop docstrings that provide the user with a general overview and understanding of the program,
⁍ creates Docstrings with triple quotes in the correct location
⁍ explain the purpose of a function using a docstring
Notice how I used bold to highlight my power verbs? Power verbs help students and act as a reminder that this specific action is essential for the assessment.
There are varying degrees of understanding and knowledge needed, but these vary in conceptual understanding on Bloom's taxonomy levels. Choose your power verbs carefully and make sure your students know the difference between the power verbs.
Step four: Deciding on your Rubric Format
Now it is time to decide on your rubric format. There are many formats used; you can scale the levels 1-3, 1-4, 1-5. You can weigh the bold concepts on the importance, or you can use a single-point rubric.
I prefer the latter. You can read more about the single-point rubric here.
After I have copied my objectives, my rubric will look something like this:
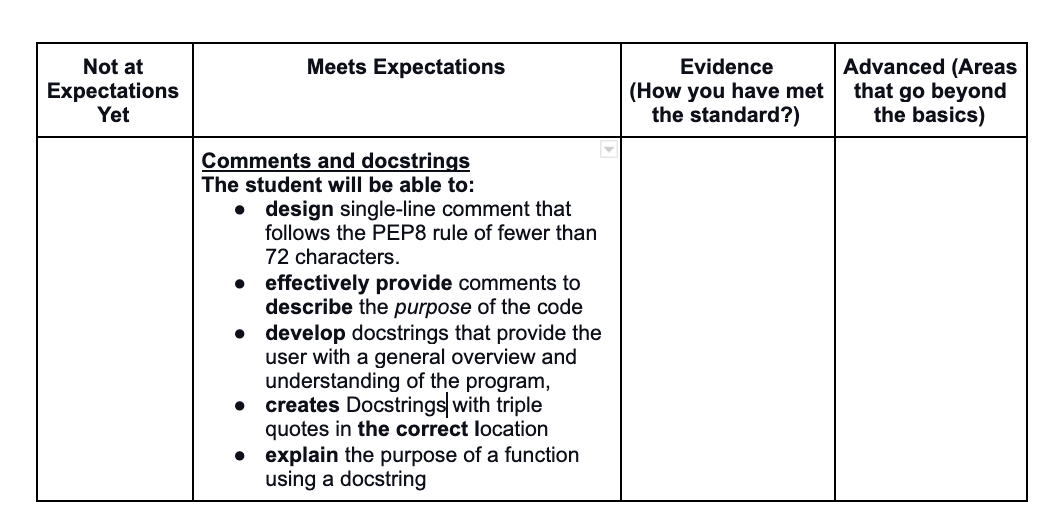
I like giving students the flexibility to excel in the concepts they are solid or confident in and still provide the flexibility to differentiate learning. Using a single-point rubric ensures students first a) provide evidence of where they have met the expectation and b) demonstrate how they have exceeded expectations, they know where and how.
Having students write their accomplishments does two things. First, it provides students with a checklist; however, it also adds an extra assessment evaluation.
Step five: Testing it Out
All rubrics can be improved. Just because it looks and makes sense to you does not mean it is ready for implementation. I like to use my rubrics for nongraded assignments before the real assessment. Moreover, I like to use them in chunks. For example, I may use one or two strands for a small task or design a class challenge or teaching assignment for one of the criteria.
Some teachers may feel that giving these rubrics before the assessment or during teaching feels too much like "teaching to the test"; however, it is not.
If these are the criteria that you feel are important for your students to learn, doesn't it make sense that they know them and practice them?
Have the students provide you with feedback on the rubrics. Let the students be reviewers of their peer's assessments. Encourage conversations about objectives or other understandings that may need more work. By working with and improving upon the language in the rubrics as you teach, you ensure that the students can use and excel in the objectives that are important for the curriculum.
Rubrics are a great tool for authentic assessments, classroom assignments and formative assessments. They can help to propel learning and understanding as well as provide a method to assess fairly.
“Deliberate and focused instructional design requires us as teachers and curriculum writers to make an important shift in our thinking about the nature of our job. The shift involves thinking a great deal, first, about the specific learnings sought, and the evidence of such learnings, before thinking about what we, as the teacher, will do or provide in teaching and learning activities.” - Grant Wiggins
By designing rubrics, we enforce selecting objectives and specific learning outcomes before going through the activities we plan to teach and avoid the "forward teaching approach" that may be less beneficial for students.
Check out this post from Ivy Panda that has some interesting information on different types of rubrics.
### [Shop with Teaching Python](https://shop.teachingpython.fm/) ###